Monday, April 16, 2012

Flower Clips

Hello Everyone

   Hope you all are doing great, me I'm abit under the weather, so for today I made a really simply craft. Flower clips, you can put them on headbands, lace headbands, rubber band, beanies, or just by themselves. Here is the pic of the flower clips by themselves:


   The materials I used are:
  •  Fake flowers
  •  Gems
  •  Clips
  •  Glue Gun
   Here is a pic of the materials, minus the glue gun:


   First I took apart the flowers. Shown here:


   I then glued each layer of flower together. Then I glued the gem to the center and last I glued the clip to the back. Here it the pic of the glued flowers and gem:


   One last little note: If you notice on the last pic, I did not use the back and the center of the original flower. I hope you liked my this post. I hope I feel better tomorrow so that I can make a better project. Hope you all have a great day and Happy Crafting!!


Friday, April 13, 2012

Easter Layout

Hello Everyone!!

  Hope everyone is well and in the best of Spirits!! I feel better good today, and today I made the Easter Layout I said I'd post on Monday. It's a bit late but it's made. I haven't added the pictures yet, as I still have to print them out, I will use two pictures of my girls together and one of them Egg hunting. The pictures will go on the patterned paper and the journal will be on the solid piece of paper. Here is a picture of the layout:


 The materials I used where Easter themed paper I had and scraps of paper I had on hand. As well as some paper and felt flowers, button, Easter Ribbon, Easter stickers, and my Epiphany Crafts Round 25 tool. The next three pictures are of the stuff I used and two close ups of the layout:


   Hope you all liked my layout and that it gets your brain going to create your own! Have an awesome day and Happy Crafting!!


Thursday, April 12, 2012

Bead Bib Necklace

Hello Everyone

   Hope you are all doing awesome this morning! I'm doing great, and for today's project I decided to take a break from paper crafts and made a necklace out beads and ribbon. Here is a picture of the necklace:


   Here are the materials I used:
  •  Clear Beads
  •  Black Beads
  •  Black Transparent Ribbon
  •  Clear Rock Charm
  •  Clear String
Here is a picture of my materials:

 
  Hope you all liked my Necklace and you all have a wonderful day! Happy Crafting!!


Wednesday, April 11, 2012

Cell Phone Leash

Hello Everyone,

   Good morning, hope you all are having a great day so far. Mine is going good, but yesterday I finally got tired of misplacing my stylus for my Gypsy, so for today's craft I made a Cell Phone Leash to put on my stylus. Here are two pictures of the front and the back:


   Here are the materials I used:
  •  Potpourri Basket Cartridge
  •  Epiphany Crafts Square 25 Tool
  •  Epiphany Crafts Square 25 Double sided Charm
  •  Cell Phone Leash
  •  Assorted Beads I had on hand
  •  Eye Pins

   I cut the Cricut guy at .73'' and I don't remember how small I cut the Dream and the Dream Shadow, but I wanna saw .95''.  The next pictures are of the materials and the pieces before I put them all together. The other two pictures are close ups of the charm and beads.


   Now that I have this Cell Phone Leash on my Stylus, I hope I don't misplace it anymore, lol. Hope you have a wonderful day and Happy Crafting!!


Tuesday, April 10, 2012

10 Things... Card

Hello Everyone!!

  Today I made a Missing you Card for my parents. It's pretty simple but I like it and keeping things simple is my style :) Here is a picture of the inside and front of the card:


   The materials I used are:
  •  Art Philosophy Cartridge
  •  Blue cardstock and Blue pattern paper
  •  Black twine
  •  Black Ink
  •  10 Things... stamp set from CTMH
  •  Black Sharpie

   I used my gypsy to cut out the card at 6' in height and the top layer the height was 3' I then placed the an image on top of it so it would cut out the window at 2.73' width. I made the inside pocket out of a 3' scalloped square and the tabs were cut at 4' in height, I used a rectangle for it. When I was putting it together I had to trim them a bit. I don't have number stamps, so I decorated the tabs myself. I didn't clean off my block so I got a little extra ink on my scalloped square, but now I know for next time. Now that it is all put together I can write something on each of the tabs. Here is a picture of the pieces before I put it together:


   I hope you all liked my card, and hope you all have a great day!! Happy Crafting!


Monday, April 9, 2012

Gift or Party Favor Door Hanger

Hello Everyone,

  I had a couple of complications this morning, first my Internet was done and two minutes after my husband got it working our power went out, but it's all back on. YAY!!!

  A friend of mine had her birthday this past weekend, and she loves doing her nails. I remember seeing this on Pinterest here: http://pinterest.com/pin/16958936066513376/, but I did it a little different. Instead of a bag to put all the stuff in I made a door hanger box out of my Art Philosophy Cricut cartridge.  Here is mine:


  The materials I used are:
  •  Art Philosophy Cartridge: to cut the door hanger at 11.5 in., the scalloped oval at 2 in., and the flowers 2 at 2 in. and 2 at 1.5 in.
  • I used the stamp set Look Who's ... from Close To My Heart.
  • I used the ink colors: Moonstruck and Cranberry.
  • Dk Blue cardstock, Lt. blue paper and a festive paper.
  The next pictures show the pieces I had before I put is together and the a pic at a different angle and a close up of the front.


  The first link is to the Pinterest site, so I clicked on the Pinterest link and here is the link to the actual blog spot: http://lifeinthethriftylane.blogspot.com/2011/11/favors-for-teens-attempt.html. I hope you like it and it inspires you to make your own. Hope you all have a great day, and as always Happy Crafting!!


Friday, April 6, 2012

Easter Basket

Hello everyone!

   Hope you are all having a great day! For today's project I made Easter baskets for the kids as little gift bags. I found the idea here : http://www.mypassionforscrapbooking.com/blogpost-74853/Quick-Easy-Baskets.html, with Mandy Leahy. Mine are abit different, but it's the same concept. Here is a pic of mine:


   Here is a list of materials I used:

  •  AP Cartridge: Square Scallop 9 in.
  •  Cardstock and Patterned Easter Paper
  •  Grass
  • Plastic Eggs Filled with goodies
   The square scalloped was cut at 9 in and the handle is 12 in. x 1 in. out of cardstock so that it is sturdy. For the boarders I cut the width at 2 1/4 in. the lengths I eye balled. The ones with the bunny I did on my Gypsy with a rectangle measuring 3 in. x 2 1/4 in. and the bunny is 1 1/2 in. I used the 1 st layer of the Bunny on Create A Critter. Here is a picture of the pieces before I put them together:


   The next pictures that follow are just close up of the baskets. I also don't have a paper trimmer, so I scored 3 in. in on either side and then cut down 3 in.


   Hope you enjoyed my project and everyone has a great Good Friday, and a Happy Easter!! See you all on Monday, and always Happy Crafting!!

Thursday, April 5, 2012

Easter Hair Bows

Hello Everyone!

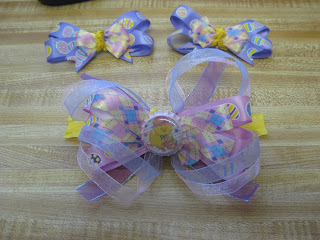
   Hope you are all having a great day! I'm running way behind today. I still have lots of house work to do. But I did get the hair bows done and here they are:


   The two little ones are for my 1 yr old and the big one is for my 6 yr old. I got all the ribbon at Hobby Lobby. A couple years ago I found this site called All Things Girly and they have instructions for bows, clips, and sorts of other things. The only thing I've had are some of the bows and I find the instructions very easy follow. Here is the web site: http://www.girlythingsbows.com/, they also give you advice if you wanted to make a business out of it. It's an awesome site and it's free.

   Here is a list of materials I used:
  •  Eater themed ribbon
  •  Pink and Purple ribbon
  •  Glue Gun
  •  Bottle Cap
  •  Epiphany Crafts Tool Round 25
  •  Blank barrettes
For the two small bows I cut the egg ribbon at 20 in. and the patterned ribbon at 10 in. The yellow ribbon for the know was cut at 6 in. For the Bigger bow I cut the egg ribbon at 29 in and the see thou pink and purple ribbons to make the loops at 30 in. The yellow and darker see thou purple where cut at 6 in. each. The last patterned ribbon was cut 20 in. Here is a pic of the pieces before I put them together:


   The next three pics are of the materials I used and close ups of the bows. I hope you enjoyed them and I can't wait to put them in my daughters hair on Easter Sunday!!


   For better instructions and measurements you can go here http://www.girlythingsbows.com/, it's an awesome site. I don't use the instructions they have to the tee, because the widest ribbon I have is 5/8 in. but you can make it work if I can. I don't know what I have planned for tomorrow, but I'll try very hard not to post late. Hope you all have a great day and Happy Crafting!!


Wednesday, April 4, 2012

Easter Door Hanger

Good Morning Everyone!!

   Today should be a great day, we had some thunderstorms yesterday afternoon, but today looks very clear. Hope everyone's weather is nice.

   For today's project I made a door hanger to put on my daughter's door for Easter morning. For the pics I filled it with Valentine's day candy, because I haven't bought Easter candy yet. I did it just so you can get the idea of the project. hope you like it.


   This is a very simple design. Here is a list of the materials I used:
  •  Art Philosophy Cartridge
  •  Create A Critter Cartridge
  •  Potpourri Basket Cartridge
  •  Easter Stickers I had
  •  Yellow, Orange, and Striped Cardstock
  •  Gypsy
  •  Cricut Expression

   With my AP cartridge I cut out the Door Hanger at 11.5 in., the square is 3 in., and the Egg at 2 in. To give the egg the cracked look I took some wave scissors and cut it in half. With Create A Critter cartridge I cut the 4 layers of the Chick at 1 in. With the Potpourri Basket cartridge I cut the grass at 3 in., for the grass I went by the width. I added the Egg Hunt and 2 egg stickers to give it alittle something extra. I used my Gypsy to place all the pieces and then connected it to my Expression and pressed cut. However, the door hanger had to be cut by it's self because of the height.

   The next two pictures show the Door hanger in use and a close up of the scene. Again I did use Valentine's day candy, because I have not been to the store yet to buy Easter themed candy.


   The next picture shows all of my cut outs before I put it all together.


   I hope you all enjoyed my project for today. For tomorrow I have some Easter hair bows I made for my daughters. Hope you all have a safe and wonderful day, and as always Happy Crafting!!


Tuesday, April 3, 2012

Easter Card

Hello everyone,

    Sorry I'm posting this kinda late, I lost time yesterday. After I post this card, I'm going to start work on tomorrow's project. I'm still new at all this blog thing, and I'll try posting my new post late at night for the next day. So please bare with me while I get things right.

   I decided that since it is Easter this Sunday, that I would make Easter inspired things this week. So for today I made this Easter Chick card using: Art Philosophy, Create A Critter, and Gypsy Font Cartridges.


    Sorry the picture came out sideways, and I can't figure out how to turn it around. I didn't take the pic this way either so I don't know what happened. But, here is a list of the matierals I used:

  • Art Philosophy Cartridge from CTMH
  • Create A Critter Cartridge from Cricut
  • Gypsy Font
  • Gypsy
  • Cricut Expression
  • Butterfly Stickers I had on hand


     The two pics above show my screen on my Gypsy and how I placed the paper on my mat so that the object cut on the paper I wanted. I love my Gypsy because I took the AP cartridge and Create A Critter cartridge and cut out all the images at once. Sorry the Gypsy pic is blurry no matter how many times I took the pic this was the best one :(


   The top three pics show all my pics cut out before I but the card together, and a couple close ups of the card. I don't know why they are sideways I didn't take the pics that way. Sorry.

   I hope you like my card and I'm going to go get started on tomorrow's project. Hope you all have a great day and Happy Crafting!!


Monday, April 2, 2012

Bib Necklace

Good Morning Everyone!

    Hope you all had a great weekend! We did alot of cleaning and my 6 yr old had her first Coach Pitch game this past weekend.

    Well, now it's time to get into the craft stuff!! What I made was a Bib Necklace (Statement Necklace) I got the idea from my Close To My Heart consultant Mandy Leahy. You can visit her blog, http://www.mypassionforscrapbooking.com/blogpost-69493/Paper-Statement-Necklace-Video-Tutorial.html, she also has a video to show how to make the flowers and the accordion circles. Here is a pic of the necklace I made. Her's looks sooo much nicer, plus her video is a great help.


    I used White, Black, and different shades of Blue cardstock and paper. I cut the flowers out of my Art Philosophy cartridge and my Cricut. I cut some at 3 in., 2in, and 2 1/4 in. I used gems to embellish it abit, on the White cardstock I took a star stamp from CTMH Princess Wings stamp set with Moonstruck ink, and a chain I bought at Wal-Mart, from the jewelry section. Here is a picture of the back of the necklace and a picture of some of the stuff I used. I forgot to add my Art Philosophy cartridge and my Cricut machine.


    I use alot of CTMH products, and my consultant Mandy Leahy is so wonderful. She is in California and I'm in Texas and she has been so much help. I couldn't get help from the one's in my area, and she was there to answer my questions. You can visit her blog, http://www.mypassionforscrapbooking.com/, she has links to her on-line store, she posts lots of creative stuff, and she has monthly giveaways!

   I hope everyone has a great day, and I'm going to try to do some Easter stuff for this weekend!! See you all tomorrow!! Happy Crafting!